How can I put my business onto the Web after studying ITC594 course?
First of all, I should define business model, for example, b2b or b2c... etc. Then, I should use a SDLC methodology for website application development. For fast changing environment, I should use Agile or rapid evolutionary prototyping as my SDLC. These SDLC consider that users have to review the prototype until the final version of the prototype is built.
In order to develop the prototype fast, the selection of programming language becomes critical. The programming language should be with OO and MVC Approach when considering reusability and maintainability.
Thus, I should use ROR. ROR is easy to use and learn although I have encountered many issues like, installation and syntax changes problems. Through workshops, I have learned ROR gradually and the mentioned issues are all fixed. Again, ROR brings convention over configuration, that is, the class name in model is the same as the table name in database by default. DRY prompts that a modification of one element of a system does not change other logically-unrelated elements. Scaffolding in ROR helps to make web applications in a few minutes, for example, I can make user authentication and registration very fast.
Beside prototyping & programming, I need to think about the connectivity, platform, security, privacy, payment method & design issues. For instance, for connectivity concern, a suitable protocol like tcp/udp is selected. Does MS-Windows or Linux suit the web application? Any fault tolerance? Any encryption and authentication are offered? Is cookie enabled? Accept VISA? Is Multimedia like VoiceXML or software agent available? All these questions have to be answered in mind.
Finally, I put my business onto the web through web application development framework while all mentioned aspects are concerned.
It is Joseph Cheung's Progress Report through Elevator Pitch.
16 May 2009
Focus Group II
Dear All,
When using scaffolding of ROR to build website, I hit a very strange issue, that is, if creating a table with less than 4 fields, scaffolding does not work. If more than or equal to 4 fields, scaffolding works.
Anyway, to work around, I am focused to add one more field to table so as to use scaffolding.
Please feel free to leave me message to share.
Thanks,
Joseph
Workshop 8 Ruby on Rails Workshops Report and Evaluation
Evaluation and Report
1. List what you consider to be the three strengths of Ruby on Rails workshop series.
Answer:
I consider the 3 strengths to be:
a. The ROR workshop series are easy to understand as the series are simple and clear. Through the workshops, students can learn ROR gradually.
b. There are many useful references in the ROR workshop series, for example, rubyonrails.org web training, RailsSpace... etc
c. Step-by-Step demonstration in WorkShop6 gives students useful guideline.
2. List what you consider to be the three weaknesses of Ruby on Rails workshop series:
Answer:
I consider the 3 weeknesses to be:
a. Many informations are repeated from workshop 1 to 4
b. Some commands are incorrect due to version changes
c. Except Workshop6, there is NO step-by-step demonstration in other workshops
3. List what aspects of Ruby on Rails workshop series that you found to be most difficult.
Answer:
The most difficuly aspects were:
a. Debug ROR program codes because different versions contains different codes
b. Initial Installation of ROR
4. List what improvements could be made to the Ruby on Rails workshop series:
Answer:
Improvements I would make include:
a. Standardized ROR version, for example, all HK classes use InstantRails2.0...
b. More step-by-step demonstration
c. Standardized command lists. (It is because in each version of ROR, the syntax changes too much and students need to spend much time to seek for the correct syntax of one ROR version.
Free response and reflective questions:
5. Reflect on your experiences with the other Web framework used in this subject: Was it effective? How can it be improved? Should other Web frameworks be used as well or instead of Ruby on Rails?
Answer:
Yes, I have used PHP and JSP tomcat to build B2C websites. However, I would like to build my own codes. Thus, this is my first time to use Web framework. After using ROR, I feel Web framework is effective (especially for programming beginner). The ROR Web framework can be improved, for example, GUI is welcome instead of typing commands in command prompt. Yes, other Web frameworks should be used as well as ROR.
6. Did the Developer’s or IT managers Team that you joined after workshop 4 have a preference towards using other tools to facilitate collaboration? Comment on the differences between these use of the sub-forum or Interact wiki tools from your experiences in this subject.
Answer:
I perfer not to have sub-forum because without sub-forum, all informations can be centralized in a single source. The difference between the use of sub-forum and Interact wiki tools is that sub-form is free format and contains too many unrelated information when Interact wiki tools focus on topics.
7. Further comments to add?
Answer:
Too many exercises
To Do List....
DEVELOPER’S THREAD (RED team)
To Do:
Developers conclude their work with the OTBS and look at the options for deployment of the site. Examine the various platforms/software tools used for deployment such as UNIX environment suggested in the Discussion Notes, Mongrel or Mongrel cluster, Nginx, Subversion or Capistrano (during development stage), JRuby in the Java environment.
Which way?
The choice is up to you as this workshop present just one option and you may like to use another, such as deploying the OTBS in a .NET or J2EE environment
Can you get the OTBS Running in production mode as a minimal production server?
Share your success by posting progress comments and links etc to the Developers sub-forum site that has been set up for the Red team.
Answer:
From Workshop 1 to 8 and From Exercise 1 to 26, I learn the concepts of e-commerce and online applications gradually. Especially, I feel interested in Workshops as it is related to the new technology namely ROR. In these workshops, I know the MVC approach, scaffolding, convention over configuration. At the end, I study intensively about user authentication and registration.
In this workshop, I would like to select Linux as the platform since Linux is freeware and stable comparing with MS-Windows. Also, I would like to use Mongrel or Mongrel cluster to install in the platform and running the OTBS. Mongrel is also a free middleware in ROR. In all my workshops, I use mongrel so I am get used to Mongrel and my skillset is built on Mongrel, although there may be another better choice.
Yes, I can get the OTBS running in production mode as a minimal production server in my office Intel Xeon machine.
I feel my studies on ROR and e-commerce are successful. For detail, please read my blog at http://itc594josephc.blogspot.com/
I have posted my progress comments at CSU's Developers sub-forum site. The URL is http://forums.csu.edu.au/perl/forums.pl?task=frameset&forum_id=ITC594_200940_W_D_Sub1_forum&message_id=3824115
Workshop 7 End of the Line: production site migration and maintenance
Topic reading from Safari Books Online
Hartl, M & Prochazka, A, (2008). RailsSpace: Building a Social Networking Website with Ruby on Rails, Pearson Education
This workshop continues to use your reading of the ‘RailsSpace’ online book and use of other online sites.
Answer:
I have read the required online book at CSU library.
Focus Question
As either a developer or as an IT manager, what are the options available when deploying and maintaining the Ruby on Rails application online?
Answer:
According to the given discussion note, I discuss with Sam Kwong. The options available when deploying and maintaining the Ruby on Rails application online are...
1. Windows Platform VS Linux
We select Linux as our platform because Linux is freeware with higher stability than MS-Window
2. Skillset on ROR and Platform
There is no issue on skill set of ROR and Linux Platform because both of us have sound skills on ROR and Linux
3. Hosting Issue
I will place the server in our office as a production environment
4. Scalability
I will use the mongrel clusters for fault tolerance and Lunix RAID 5 external diskarry so volume expansion become easy.
5. Tools
We will use ROR freeware tools on the web.
From the given intruction,
which way you choose to go will most likely depend upon:
- The user interface and your own skills;
- How quickly you are guided through deployment by admin tools that simplify management of the system;
- System back-up, data security, virtualization and portability features:
- Future-proofness: (grid computing or a cloud computing service);
- How much time and money is saved by an efficient deployment and maintenance schedule.
14 May 2009
To Do List....
DEVELOPER’S THREAD (RED team)
To Do:
Developers may continue to build upon work with the OTBS using the topic reading to help with user registration and advanced login features from Hartl et al (2008).
* generate a controller and an action by adding a method(s) to a controller;
* create a view template for each action and to link to actions from views;
* use AJAX to improve the user experience;
Share your success by posting progress comments and links etc to the Developers sub-forum site that has been set up for the Red team.
Answer:
From Workshop 1 to 4 , I have successfully built the simple taxi booking system and now I will briefly describe this Online Taxi Booking System (OTBS) according to the Workshop6's requirement.
Taxi & Passenger ActiveController and the related ActionViews (list, show, create methods) have been built during Workshop1 to 4. The Diagram-121 to Diagram-127 shows what I have been done for these Workshop.
Diagarm-121 - The List method of Taxi Class shown in ActionView (list.rhtml)
In Diagram-121, when users click on one of the Taxi link, the detail of that Taxi will be shown like the one in Diagram-122
 Diagram-122- The Show method of Taxi Class shown in ActionView (show.rhtml)

Diagram-123 - The index method of Passengers class shown in index.rhtml
In the index.rhtml, when users click "new passenagers" link, users can add new passengers to book the taxis.
Diagram-124 - The new method of Passengers Class shown in ActionView (new.rhtml)
When users click on "show" link in index.rhtml, the users can see the detail of booking' and passengers' record.
Diagram-125 - The show method of Passengers Class shown in ActionView (show.rhtml)
When users click on "edit" link in index.rhtml, users can modify the existing booking.
Diagram-126 - The edit method of Passengers Class shown in ActionView (edit.rhtml)
When users click on "destroy" link in index.rhtml, users can cancel or delete the booking.
Diagram-127 - The destroy method of Passengers Class
I have successfully create a template for ActionView. The template is called 'standard'. All the views in OTBS will use this template. The following is the screen dump of one of the views.
Diagram-128 - The list ActionView (list.rhtml) of Taxi Class after applying the template to the ActionView
The AJAX is also utilized in order to enhance user's experience. My AJAX is to add a new taxi in ActiveRecord of Taxi Class. When clicking "add a Taxi" link, the text box and add button are shown (See Diagram-129).
Diagram-129 - AJAX functionality so as to add new Taxi
When the text field and add button are shown, users can type in the name or the brand-name of the Taxi. For example, I add Honda as the Taxi's name. (See Diagram-130)
Diagram-130 - Entering the name of the taxi
After the name is inputed, users can click "add" button to add the Taxi and the newly added Taxi will be displayed in the same html page directly due to the feature of AJAX.
Diagram-131 - New Taxi Name "Honda" is added and displayed once the "add" button has been clicked
The next diagram show the template 'standard' is applied to Passenger ActiveController.
Diagram-132 - The Passenger ActionController together with the template 'standard'
The source code of the template 'standard' is put into the "/app/views/layouts" folder and the file name of the template is called 'standard.rhtml' or 'standard.html.erb'.
Diagram-133 - The template 'standard' for all views inside OTBS system
In the template 'standard', there is a Cascading Style Sheets (CSS) used and stated. This CSS is used to help to format the views to display, for example, formatting the font size. The source code of the CSS called 'style.css' and located at 'public\stylesheets' is shown in Diagram-134.
Diagram-134 - the source code of style.css stylesheet
Next, the Diagram-135 shows the ActionView of Taxi Controller Class. The list.html.erb is for list method defined in Taxi Class. The show.html.erb is for show method define in Taxi Class. The _taxi.html.erb contain the JavaScript for the AJAX functionality inside list.html.erb.
Diagram-135 - ActionView for Taxi Controller
The source code of _taxi.html.erb JavaScript is listed in Diagram-135.
Diagram-135 - the source code of _taxi.html.erb
The source code of the list.html.erb contains the AJAX code which calls _taxi.html.erb Javascript.
Diagram-136 - The source code of list.html.erb
From workshop6's requirements, I need to create user authentication and user registration. Therefore, I create the related controller and method. The controllers' names are main (user registration) and panel (user authentication). In order to create the ActiveRecord and the table in MySQL, I first use "ruby script/generate model User" to create the "user.rb" (See Diagram-137)
Diagram-137 - The content of user.rb
After that, according to the definition inside user.rb, the user table is created. The Diagram-138 shows how to create the table using rake command and the ruby command to create main controller for user registration.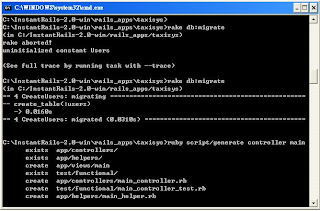
Diagram-138 - Rake Command to create table and Ruby command to generate main controller
In diagram-138, the main controller is created. To customize the main class, I have modify main_controller.rb under '/app/controllers/' folder.
Diagram-138 - main_controller.rb
In Diagram-138, the register method of User Class is defined.
The Diagram-139 is the ActionView for the register method.
Besides, in order to make registered users can login, I create panel controller for users' login. (see Diagram-139)
Diagram-139 - the creation of panel controller
The panel_controller.rb is located at "/app/controllers/" folder. Then I modify the panel controller. (See Diagram-140)
Diagram-140 - the content of panel controller where the login method is defined
The login method is then handled by ActionView. Now, the view is login.html.erb. (see Diagram-141)
Diagram-141 - login.html.erb
When users logs into the system successfully, the portal will be accessed. Thus, the portal controller is generated (see Diagram-142)
Diagram-142 - the creation of portal controller
Inside the portal controller, index1 and index2 methods are defined.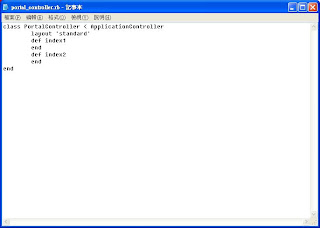
Diagram-143 - index1 & index2 methods inside portal controller
The Diagram-144 shows the index1 ActionView (index1.html.erb)
Diagram-144 - index1.rhtml
The Diagram-145 shows the index2 ActionView (index2.html.erb)
Diagram-145 - index2.html.erb
After all, the functionalities of user authentication and registration inside OTBS are workable. For example, in Diagram-146, when the user does not enter username for registration, OTBS will prompt an error.
Diagram-146 - User registration when errors
To correct the error in Diagram, the user should fill in the username field (no empty field is allowed). The Diagram-147 shows the correct information is entered.
Diagram-147 - correct information during user registration
After the correct information is entered into system and "register me" button is clicked, OTBS will tell the user that he or she is registered successfully (see Diagarm-148)
Diagram-148 - successfully registered
Once registered, the user need to login. The Diagram-149 shows the logon screen but the user login with wrong password so the error is prompted.
Diagram-149 - Login Page with error when wrong password is applied
The Diagram-150 shows the user login with the correct password.
Diagram - login page with user's input
After successfully login, the user can view the information of Taxis or book Taxis.
Diagram-151 - At Portal after successful login
The user can select view Taxi's information or book taxis (See Diagram-152)

Diagram-152 - Book Taxi or View Info
I have successfully met the requirements...
1. User Ajax --> Done
2. Use Template and CSS --> Done
3. Create Controller Class and Create method and View for the Class --> Done
Reference:
1. http://codingbitch.com/p/comboy/User authentication in Ruby on Rails
2. http://www.ruby-forum.com/topic/91797
To Do:
Developers may continue to build upon work with the OTBS using the topic reading to help with user registration and advanced login features from Hartl et al (2008).
* generate a controller and an action by adding a method(s) to a controller;
* create a view template for each action and to link to actions from views;
* use AJAX to improve the user experience;
Share your success by posting progress comments and links etc to the Developers sub-forum site that has been set up for the Red team.
Answer:
From Workshop 1 to 4 , I have successfully built the simple taxi booking system and now I will briefly describe this Online Taxi Booking System (OTBS) according to the Workshop6's requirement.
Taxi & Passenger ActiveController and the related ActionViews (list, show, create methods) have been built during Workshop1 to 4. The Diagram-121 to Diagram-127 shows what I have been done for these Workshop.

Diagarm-121 - The List method of Taxi Class shown in ActionView (list.rhtml)
In Diagram-121, when users click on one of the Taxi link, the detail of that Taxi will be shown like the one in Diagram-122
 Diagram-122- The Show method of Taxi Class shown in ActionView (show.rhtml)
Diagram-123 - The index method of Passengers class shown in index.rhtml
In the index.rhtml, when users click "new passenagers" link, users can add new passengers to book the taxis.

Diagram-124 - The new method of Passengers Class shown in ActionView (new.rhtml)
When users click on "show" link in index.rhtml, the users can see the detail of booking' and passengers' record.

Diagram-125 - The show method of Passengers Class shown in ActionView (show.rhtml)
When users click on "edit" link in index.rhtml, users can modify the existing booking.

Diagram-126 - The edit method of Passengers Class shown in ActionView (edit.rhtml)
When users click on "destroy" link in index.rhtml, users can cancel or delete the booking.

Diagram-127 - The destroy method of Passengers Class
I have successfully create a template for ActionView. The template is called 'standard'. All the views in OTBS will use this template. The following is the screen dump of one of the views.

Diagram-128 - The list ActionView (list.rhtml) of Taxi Class after applying the template to the ActionView
The AJAX is also utilized in order to enhance user's experience. My AJAX is to add a new taxi in ActiveRecord of Taxi Class. When clicking "add a Taxi" link, the text box and add button are shown (See Diagram-129).

Diagram-129 - AJAX functionality so as to add new Taxi
When the text field and add button are shown, users can type in the name or the brand-name of the Taxi. For example, I add Honda as the Taxi's name. (See Diagram-130)

Diagram-130 - Entering the name of the taxi
After the name is inputed, users can click "add" button to add the Taxi and the newly added Taxi will be displayed in the same html page directly due to the feature of AJAX.

Diagram-131 - New Taxi Name "Honda" is added and displayed once the "add" button has been clicked
The next diagram show the template 'standard' is applied to Passenger ActiveController.

Diagram-132 - The Passenger ActionController together with the template 'standard'
The source code of the template 'standard' is put into the "/app/views/layouts" folder and the file name of the template is called 'standard.rhtml' or 'standard.html.erb'.

Diagram-133 - The template 'standard' for all views inside OTBS system
In the template 'standard', there is a Cascading Style Sheets (CSS) used and stated. This CSS is used to help to format the views to display, for example, formatting the font size. The source code of the CSS called 'style.css' and located at 'public\stylesheets' is shown in Diagram-134.

Diagram-134 - the source code of style.css stylesheet
Next, the Diagram-135 shows the ActionView of Taxi Controller Class. The list.html.erb is for list method defined in Taxi Class. The show.html.erb is for show method define in Taxi Class. The _taxi.html.erb contain the JavaScript for the AJAX functionality inside list.html.erb.

Diagram-135 - ActionView for Taxi Controller
The source code of _taxi.html.erb JavaScript is listed in Diagram-135.

Diagram-135 - the source code of _taxi.html.erb
The source code of the list.html.erb contains the AJAX code which calls _taxi.html.erb Javascript.

Diagram-136 - The source code of list.html.erb
From workshop6's requirements, I need to create user authentication and user registration. Therefore, I create the related controller and method. The controllers' names are main (user registration) and panel (user authentication). In order to create the ActiveRecord and the table in MySQL, I first use "ruby script/generate model User" to create the "user.rb" (See Diagram-137)

Diagram-137 - The content of user.rb
After that, according to the definition inside user.rb, the user table is created. The Diagram-138 shows how to create the table using rake command and the ruby command to create main controller for user registration.

Diagram-138 - Rake Command to create table and Ruby command to generate main controller
In diagram-138, the main controller is created. To customize the main class, I have modify main_controller.rb under '/app/controllers/' folder.

Diagram-138 - main_controller.rb
In Diagram-138, the register method of User Class is defined.

The Diagram-139 is the ActionView for the register method.
Besides, in order to make registered users can login, I create panel controller for users' login. (see Diagram-139)

Diagram-139 - the creation of panel controller
The panel_controller.rb is located at "/app/controllers/" folder. Then I modify the panel controller. (See Diagram-140)

Diagram-140 - the content of panel controller where the login method is defined
The login method is then handled by ActionView. Now, the view is login.html.erb. (see Diagram-141)

Diagram-141 - login.html.erb
When users logs into the system successfully, the portal will be accessed. Thus, the portal controller is generated (see Diagram-142)

Diagram-142 - the creation of portal controller
Inside the portal controller, index1 and index2 methods are defined.

Diagram-143 - index1 & index2 methods inside portal controller
The Diagram-144 shows the index1 ActionView (index1.html.erb)

Diagram-144 - index1.rhtml
The Diagram-145 shows the index2 ActionView (index2.html.erb)

Diagram-145 - index2.html.erb
After all, the functionalities of user authentication and registration inside OTBS are workable. For example, in Diagram-146, when the user does not enter username for registration, OTBS will prompt an error.

Diagram-146 - User registration when errors
To correct the error in Diagram, the user should fill in the username field (no empty field is allowed). The Diagram-147 shows the correct information is entered.

Diagram-147 - correct information during user registration
After the correct information is entered into system and "register me" button is clicked, OTBS will tell the user that he or she is registered successfully (see Diagarm-148)

Diagram-148 - successfully registered
Once registered, the user need to login. The Diagram-149 shows the logon screen but the user login with wrong password so the error is prompted.

Diagram-149 - Login Page with error when wrong password is applied
The Diagram-150 shows the user login with the correct password.

Diagram - login page with user's input
After successfully login, the user can view the information of Taxis or book Taxis.

Diagram-151 - At Portal after successful login
The user can select view Taxi's information or book taxis (See Diagram-152)


Diagram-152 - Book Taxi or View Info
I have successfully met the requirements...
1. User Ajax --> Done
2. Use Template and CSS --> Done
3. Create Controller Class and Create method and View for the Class --> Done
Reference:
1. http://codingbitch.com/p/comboy/User authentication in Ruby on Rails
2. http://www.ruby-forum.com/topic/91797
Workshop 6 Enjoying the Ride: Web framework alternatives, scalability and flexibility
Topic reading from Safari Books Online
Hartl, M & Prochazka, A, (2008). RailsSpace: Building a Social Networking Website with Ruby on Rails, Pearson Education
Answer:
I have read the Safari Books online. The book is RailsSpace located at CSU Library. (See Diagram-110)
Diagram-110 - RailsSpace in CSU Library
Focus Question
The focus question below provides a way to shape your progress in either team as a common approach to achieving an outcome with the objectives. You get to shape the direction you take in these final workshops, but the focus question helps you get started.
Social networking is a powerful business model made possible by Web 2.0 technologies.
The online textbook called RailsSpace has this focus.
As either a developer or as an IT manager, how can aspects of social networking be applied to the OTBS?
Answer:
Web 2.0" refers to a perceived second generation of web development and design, that facilitates communication, secure information sharing, interoperability, and collaboration on the World Wide Web. Web 2.0 concepts have led to the development and evolution of web-based communities, hosted services, and applications; such as social-networking sites, video-sharing sites, wikis, blogs, and folksonomies.
Web 2.0 is the business revolution in the computer industry caused by the move to the Internet as a platform, and an attempt to understand the rules for success on that new platform.
(Wikipedia, 2009)
Our Online Taxi Booking System (OTBS) can make use of Web2.0 technology and social networking. That is, the users who always use taxi service can register in our OTBS system. When a certain number of registered users is obtained, OTBS system can be introduced to some Business Bodies, ISP or mobile service provider, namely, 3G network & iphone network. Like Facebook, MSN and Myradio (in HK), OTBS can then resident at iPhone as a platform. When the registered users want to book taxi, he may just click on the icon in iPhone or in 3G mobile phone.
Reference:
1. Wikipedia (2009). "Web 2.0". Wikipedia The Free Encyclopedia, Retrieved from URL - http://en.wikipedia.org/wiki/Web2.0
Hartl, M & Prochazka, A, (2008). RailsSpace: Building a Social Networking Website with Ruby on Rails, Pearson Education
Answer:
I have read the Safari Books online. The book is RailsSpace located at CSU Library. (See Diagram-110)

Diagram-110 - RailsSpace in CSU Library
Focus Question
The focus question below provides a way to shape your progress in either team as a common approach to achieving an outcome with the objectives. You get to shape the direction you take in these final workshops, but the focus question helps you get started.
Social networking is a powerful business model made possible by Web 2.0 technologies.
The online textbook called RailsSpace has this focus.
As either a developer or as an IT manager, how can aspects of social networking be applied to the OTBS?
Answer:
Web 2.0" refers to a perceived second generation of web development and design, that facilitates communication, secure information sharing, interoperability, and collaboration on the World Wide Web. Web 2.0 concepts have led to the development and evolution of web-based communities, hosted services, and applications; such as social-networking sites, video-sharing sites, wikis, blogs, and folksonomies.
Web 2.0 is the business revolution in the computer industry caused by the move to the Internet as a platform, and an attempt to understand the rules for success on that new platform.
(Wikipedia, 2009)
Our Online Taxi Booking System (OTBS) can make use of Web2.0 technology and social networking. That is, the users who always use taxi service can register in our OTBS system. When a certain number of registered users is obtained, OTBS system can be introduced to some Business Bodies, ISP or mobile service provider, namely, 3G network & iphone network. Like Facebook, MSN and Myradio (in HK), OTBS can then resident at iPhone as a platform. When the registered users want to book taxi, he may just click on the icon in iPhone or in 3G mobile phone.
Reference:
1. Wikipedia (2009). "Web 2.0". Wikipedia The Free Encyclopedia, Retrieved from URL - http://en.wikipedia.org/wiki/Web2.0
12 May 2009
Workshop 5 Admiring the scenery Forms, AJAX screen layout and mobile interfaces
DEVELOPER'S THREAD (RED team)
Answer:
I wants to learns more programming skills for ROR so I select RED team to be a Developer for workshops 5 to 8.
After have read the sections introduction and Building applications via document requests in Rails, I strongly agree that ROR brings many version problems from workshops 1 to 4 of ROR. For example, start_form_tag and end_form_tag are replaced with form_tag in InstantRail2.0.
To Do:
Part A: Viewing the action
1. Create the Rails application framework in the projects folder:
C:\InstantRails\...\projects\>rails animals
Answer:
The Diagram-90 shows the output of "rails animals".
 Diagram-90 - output of "rail animals"
2. Running the application on localhost:3000 using the WeBrick ruby server (or Mongrel as alternative) and access via Web browser at http://localhost:3000/
Answer:
I am using Mongrel Web Server and the Diagram-91 shows the screen dump of http://localhost:3000/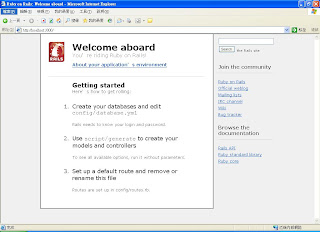
Diagram-91 - Screen Dump of http://localhost:3000/ where animals is running
3. Create the controller to make the application do an action. This is under the controller-action/model-view structure.
Stop the WEBrick server each time you edit Ruby classes and then re-start or refresh the views you are testing. Use the Ruby command below:
>ruby script/generate controller Mammal
The mammal_controller.rb contains just a bare class description:
class MammalController< style="font-weight: bold;">Answer:
In this step, the class Mammal is created and the related Diagram-92 is stated as follow.
Diagram-92 - Mammal class is created
4. Test the controller by starting the WEBrick server and navaigatibng the browser to http://localhost:3000/mammal Note how the controller name is appended to the end of the URL and that no action resulted because there are no controller methods.
Answer:
The Diagram-93 is the screen dump navigating in Browser to try to see the Mammal class.
Diagram-93 - Navigating the Mammal class but it fails
5. Create an action by editing and saving the mammal_controller.rb class in projects\animals\app\controllers using your text editor to add the method below:
class MammalController< style="font-weight: bold;">Answer:
In Diagram-94, the breathe method of Mammal class is defined.
 Diagram-94 - breathe method of Mammal class
6. Start the WEBrick server and browse at http://localhost:3000/mammals/breathe where you will get a “missing template” message since it is missing a view for the breathe method.
Rails is trying to connect the breathe method action of the mammal controller to a view, by using the action’s name – breathe. This view template is created as breathe.rhtml and stored in the \projects\animals\views\mammal directory.
Answer:
Although the breathe method is defined in controller, the view is not recreated yet. Thereby, entering http://localhost:3000/mammals/breathe in browser returns missing template error. In Diagram-95, there is the related screen dump.
 Diagram-95 - missing template
7. Create and save a view in that directory by using a text editor to create a view called breathe.rhtml
Restart the WEBrick serve r and browse again at http://localhost:3000/mammals/breathe
Answer:
After the view is created for breathe method, http://localhost:3000/mammals/breathe returns an expected result. Diagram-96 shows the screen dump.
 Diagram-96 - breathe.rhtml is shown
8. Try Ruby code and HTML in the action view by using the <%....%> wrapper around the inserted Ruby code. Here are some snippets to try from workshop 4:
a. 5 + 6 =<%= 5 + 6 %>
b. =<% 4.times do %>
Inhale Exhale
<%end%>
c. Time is <%=Time.now %>
NOTE: in practise you normally perform calculations in the action (method) and pass the results to the view
Answer:
The result is shown in Diagram-97.
Diagram-97 - modification of the codes of breathe.rhtml
Part B: The active view: passing data from an action too a view
1. Create a new application called scenery in the same projects directory to demonstrate the use of an active view.
> rails scenery
> cd scenery
Answer:
The command output is shown in Diagram-98.
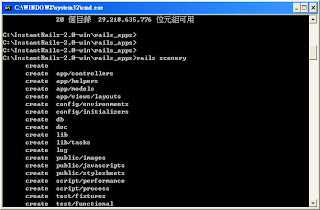 Diagram-98 - the command output of "rails scenery"
2. Create a controller called Demo in scenery\app\controllers
scenery> ruby script/generate controller Demo
Answer:
The Demo controller class is created (see Diagram-99)
 Diagram-99 - Demo controller class
3. Add an action to demo_controller.rb as the method called rubycobe
class DemoController< style="font-weight: bold;">Answer:
I use text editor to modify the demo_controller.rb controller class and the Diagram-100 shows the screen dump of defining the method rubycode.
 Diagram-100 - rubycode method inside Demo Class
4. Add a view template - scenery\app\views\demo\rubycode.rhtml
We will edit this view in later steps but you may like to add your own test HTML code to the view at this stage.
Answer:
I use edit.exe text editor to edit rubycode.rhtml. The Diagram-101 shows the related screen dump.
 Diagram-101 - rubycode.rhtml
5. Save and restart the Web server and navigate to http://localhost:3000/scenery/rubycode
Answer:
The output of rubycode.rhtml is shown in Diagram-102.
 Diagram-102 - rubycode.rhtml
6. Use the Time.now example to pass data from an action to a view.
7. Modify and save the rubycode action with a value for the time instance variable in the DemoController class in app\controllers\demo_controller.rb
class DemoController< time_now =" Time.now">
9. Restart the Web server and navigate the browser to http://localhost:3000/demo/rubycode
Data has been passed from the action to the view as it is done with SQL requests. The instance variables of a Ruby class are available to view templates by referencing the action’s instance variables by name in the view .rhtml template.
Answer:
I have then modified the demo_controller.rb with the given instruction. After that, running http://localhost:3000/scenery/rubycode in browser returns that @time_now parameter is passed into rubycode view. It is called by reference. The diagram-103 shows the modified demo_controller.rb file and the output of rubycode.rhml.

 Diagram-103 - the modified demo_controller class and the output of rubycode.rhtml
Part C: Screen layouts and forms processing with text fields, check boxes, radio buttons and multiple list controls
1. Create a new application called scenery in the same projects directory to demonstrate the use of an active view.
> rails scenery
> cd scenery
Answer:
The cabs project is created as requested. The Diagram-104 shows the command output.
Diagram-104 - the command output of rails cabs
2. Create a controller called Vehicle in cabs\app\controllers
cabs> ruby script/generate controller Vehicle
Answer:
The Vehicle class is created and is shown in Diagram-105.
 Diagram-105- Vehicle class is generated.
3. Add an action to vehicle_controller.rb as the method called cabtype
class VehicleController< style="font-weight: bold;">
Answer:
I then added method to vehicle class (see Diagram-106)
 Diagram-106 - cabtype method
4. Add a view template - cabs\app\views\vehicle\cabtype.rhtml
We will edit this view in later steps but you may like to add your own test HTML code to the view at this stage.
Answer:
The view template cabtype.rhtml is created for the cabtype method. (See Diagram-107)
Diagram-107 - View Template cabtype.rhtml
5. Save the view and restart the Web server and navigate to http://localhost:3000/cabs/cabtype
Answer:
After that, I run http://localhost:3000/cabs/cabtype in the browser and get the result in Diagram-108)
Diagram-108 - The output of cabtype
6. Create a file in the public directory - \cabs\public called input.html
Answer:
The input.html is created with the given html codes and shown in Diagram-109.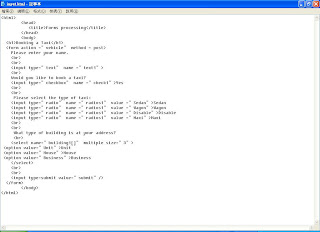
Diagram-109 - input.html
7. Edit the vehicle_controller.rb here is a start. The data in each form element in the Rails application can be accessed via its name and a hash called params.
class VehicleController< data1 =" params[:text1]" data2 =" params[:check1]" data3 =" params[:radios1]" data4 =" params[:building1]" style="font-weight: bold;">Answer:
The vehicle_controller.rb file is modified and shown in Diagram-110.
 Diagram-110 - the modified vehicle_controller.rb
8. Edit the view template cabtype.rhtml
Answer:
The cabtype.html is edited and shown in Diagram-111
Diagram-111 -cabtype.html
9. Start the Web server and go to the opening page of this application at http://localhost:3000/input.html
Answer:
http://localhost:3000/input.html is shown in Diagram-112
Diagram-112 - output of input.html
10. Submit the forms data. What do you find?
How it works
When you use the params method in Rails, it implements the details of the parameter hash to be changed without breaking existing code. For example, the params hash for radios1 will contain the value of the radio button and the data is extracted in the cabtype action. With the multiple list box example in Rails, using the select controls, the params hash of building1 is an associative array (dictionary) holding the users multiple selections and is not just a drop-down list.
Rails supports other HTML controls for forms processing via text fields, check boxes, radio buttons and list select controls etc. As an example start_form_tag abd stop_form_tag as well as methods for each item such as the create field method text_field_tag.
Answer:
My finding is when I enter the data in the field and click "submit". The data is passed from input to cabtype.rhml and also displayed in cabtype.rhml. The cabtype.rhml also does some logic checking. If the click box is not clicked, the program prompts error. (See Diagram-113)
Diagram-113 - The result after click "submit" button
11. Report your progress or findings in your Developers Blog.
Answer:
I have successfully implemented this workshop. All expected results are returned.
My findings is that
a. Many given links is wrong
b. Some html code does not obey xhtml standard, like br
c. The form cabtype.rhtml contains some wrong script. Sam Kwong and I debug it and get the expected result.
Answer:
I wants to learns more programming skills for ROR so I select RED team to be a Developer for workshops 5 to 8.
After have read the sections introduction and Building applications via document requests in Rails, I strongly agree that ROR brings many version problems from workshops 1 to 4 of ROR. For example, start_form_tag and end_form_tag are replaced with form_tag in InstantRail2.0.
To Do:
Part A: Viewing the action
1. Create the Rails application framework in the projects folder:
C:\InstantRails\...\projects\>rails animals
Answer:
The Diagram-90 shows the output of "rails animals".
 Diagram-90 - output of "rail animals"
2. Running the application on localhost:3000 using the WeBrick ruby server (or Mongrel as alternative) and access via Web browser at http://localhost:3000/
Answer:
I am using Mongrel Web Server and the Diagram-91 shows the screen dump of http://localhost:3000/

Diagram-91 - Screen Dump of http://localhost:3000/ where animals is running
3. Create the controller to make the application do an action. This is under the controller-action/model-view structure.
Stop the WEBrick server each time you edit Ruby classes and then re-start or refresh the views you are testing. Use the Ruby command below:
>ruby script/generate controller Mammal
The mammal_controller.rb contains just a bare class description:
class MammalController< style="font-weight: bold;">Answer:
In this step, the class Mammal is created and the related Diagram-92 is stated as follow.

Diagram-92 - Mammal class is created
4. Test the controller by starting the WEBrick server and navaigatibng the browser to http://localhost:3000/mammal Note how the controller name is appended to the end of the URL and that no action resulted because there are no controller methods.
Answer:
The Diagram-93 is the screen dump navigating in Browser to try to see the Mammal class.

Diagram-93 - Navigating the Mammal class but it fails
5. Create an action by editing and saving the mammal_controller.rb class in projects\animals\app\controllers using your text editor to add the method below:
class MammalController< style="font-weight: bold;">Answer:
In Diagram-94, the breathe method of Mammal class is defined.
 Diagram-94 - breathe method of Mammal class
6. Start the WEBrick server and browse at http://localhost:3000/mammals/breathe where you will get a “missing template” message since it is missing a view for the breathe method.
Rails is trying to connect the breathe method action of the mammal controller to a view, by using the action’s name – breathe. This view template is created as breathe.rhtml and stored in the \projects\animals\views\mammal directory.
Answer:
Although the breathe method is defined in controller, the view is not recreated yet. Thereby, entering http://localhost:3000/mammals/breathe in browser returns missing template error. In Diagram-95, there is the related screen dump.
 Diagram-95 - missing template
7. Create and save a view in that directory by using a text editor to create a view called breathe.rhtml
Restart the WEBrick serve r and browse again at http://localhost:3000/mammals/breathe
Answer:
After the view is created for breathe method, http://localhost:3000/mammals/breathe returns an expected result. Diagram-96 shows the screen dump.
 Diagram-96 - breathe.rhtml is shown
8. Try Ruby code and HTML in the action view by using the <%....%> wrapper around the inserted Ruby code. Here are some snippets to try from workshop 4:
a. 5 + 6 =<%= 5 + 6 %>
b. =<% 4.times do %>
Inhale Exhale
<%end%>
c. Time is <%=Time.now %>
NOTE: in practise you normally perform calculations in the action (method) and pass the results to the view
Answer:
The result is shown in Diagram-97.

Diagram-97 - modification of the codes of breathe.rhtml
Part B: The active view: passing data from an action too a view
1. Create a new application called scenery in the same projects directory to demonstrate the use of an active view.
> rails scenery
> cd scenery
Answer:
The command output is shown in Diagram-98.
 Diagram-98 - the command output of "rails scenery"
2. Create a controller called Demo in scenery\app\controllers
scenery> ruby script/generate controller Demo
Answer:
The Demo controller class is created (see Diagram-99)
 Diagram-99 - Demo controller class
3. Add an action to demo_controller.rb as the method called rubycobe
class DemoController< style="font-weight: bold;">Answer:
I use text editor to modify the demo_controller.rb controller class and the Diagram-100 shows the screen dump of defining the method rubycode.
 Diagram-100 - rubycode method inside Demo Class
4. Add a view template - scenery\app\views\demo\rubycode.rhtml
We will edit this view in later steps but you may like to add your own test HTML code to the view at this stage.
Answer:
I use edit.exe text editor to edit rubycode.rhtml. The Diagram-101 shows the related screen dump.
 Diagram-101 - rubycode.rhtml
5. Save and restart the Web server and navigate to http://localhost:3000/scenery/rubycode
Answer:
The output of rubycode.rhtml is shown in Diagram-102.
 Diagram-102 - rubycode.rhtml
6. Use the Time.now example to pass data from an action to a view.
7. Modify and save the rubycode action with a value for the time instance variable in the DemoController class in app\controllers\demo_controller.rb
class DemoController< time_now =" Time.now">
9. Restart the Web server and navigate the browser to http://localhost:3000/demo/rubycode
Data has been passed from the action to the view as it is done with SQL requests. The instance variables of a Ruby class are available to view templates by referencing the action’s instance variables by name in the view .rhtml template.
Answer:
I have then modified the demo_controller.rb with the given instruction. After that, running http://localhost:3000/scenery/rubycode in browser returns that @time_now parameter is passed into rubycode view. It is called by reference. The diagram-103 shows the modified demo_controller.rb file and the output of rubycode.rhml.

 Diagram-103 - the modified demo_controller class and the output of rubycode.rhtml
Part C: Screen layouts and forms processing with text fields, check boxes, radio buttons and multiple list controls
1. Create a new application called scenery in the same projects directory to demonstrate the use of an active view.
> rails scenery
> cd scenery
Answer:
The cabs project is created as requested. The Diagram-104 shows the command output.

Diagram-104 - the command output of rails cabs
2. Create a controller called Vehicle in cabs\app\controllers
cabs> ruby script/generate controller Vehicle
Answer:
The Vehicle class is created and is shown in Diagram-105.
 Diagram-105- Vehicle class is generated.
3. Add an action to vehicle_controller.rb as the method called cabtype
class VehicleController< style="font-weight: bold;">
Answer:
I then added method to vehicle class (see Diagram-106)
 Diagram-106 - cabtype method
4. Add a view template - cabs\app\views\vehicle\cabtype.rhtml
We will edit this view in later steps but you may like to add your own test HTML code to the view at this stage.
Answer:
The view template cabtype.rhtml is created for the cabtype method. (See Diagram-107)

Diagram-107 - View Template cabtype.rhtml
5. Save the view and restart the Web server and navigate to http://localhost:3000/cabs/cabtype
Answer:
After that, I run http://localhost:3000/cabs/cabtype in the browser and get the result in Diagram-108)

Diagram-108 - The output of cabtype
6. Create a file in the public directory - \cabs\public called input.html
Answer:
The input.html is created with the given html codes and shown in Diagram-109.

Diagram-109 - input.html
7. Edit the vehicle_controller.rb here is a start. The data in each form element in the Rails application can be accessed via its name and a hash called params.
class VehicleController< data1 =" params[:text1]" data2 =" params[:check1]" data3 =" params[:radios1]" data4 =" params[:building1]" style="font-weight: bold;">Answer:
The vehicle_controller.rb file is modified and shown in Diagram-110.
 Diagram-110 - the modified vehicle_controller.rb
8. Edit the view template cabtype.rhtml
Answer:
The cabtype.html is edited and shown in Diagram-111

Diagram-111 -cabtype.html
9. Start the Web server and go to the opening page of this application at http://localhost:3000/input.html
Answer:
http://localhost:3000/input.html is shown in Diagram-112

Diagram-112 - output of input.html
10. Submit the forms data. What do you find?
How it works
When you use the params method in Rails, it implements the details of the parameter hash to be changed without breaking existing code. For example, the params hash for radios1 will contain the value of the radio button and the data is extracted in the cabtype action. With the multiple list box example in Rails, using the select controls, the params hash of building1 is an associative array (dictionary) holding the users multiple selections and is not just a drop-down list.
Rails supports other HTML controls for forms processing via text fields, check boxes, radio buttons and list select controls etc. As an example start_form_tag abd stop_form_tag as well as methods for each item such as the create field method text_field_tag.
Answer:
My finding is when I enter the data in the field and click "submit". The data is passed from input to cabtype.rhml and also displayed in cabtype.rhml. The cabtype.rhml also does some logic checking. If the click box is not clicked, the program prompts error. (See Diagram-113)

Diagram-113 - The result after click "submit" button
11. Report your progress or findings in your Developers Blog.
Answer:
I have successfully implemented this workshop. All expected results are returned.
My findings is that
a. Many given links is wrong
b. Some html code does not obey xhtml standard, like br
c. The form cabtype.rhtml contains some wrong script. Sam Kwong and I debug it and get the expected result.
Subscribe to:
Comments (Atom)

