Answer:
I wants to learns more programming skills for ROR so I select RED team to be a Developer for workshops 5 to 8.
After have read the sections introduction and Building applications via document requests in Rails, I strongly agree that ROR brings many version problems from workshops 1 to 4 of ROR. For example, start_form_tag and end_form_tag are replaced with form_tag in InstantRail2.0.
To Do:
Part A: Viewing the action
1. Create the Rails application framework in the projects folder:
C:\InstantRails\...\projects\>rails animals
Answer:
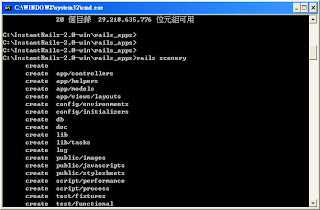
The Diagram-90 shows the output of "rails animals".
 Diagram-90 - output of "rail animals"
2. Running the application on localhost:3000 using the WeBrick ruby server (or Mongrel as alternative) and access via Web browser at http://localhost:3000/
Answer:
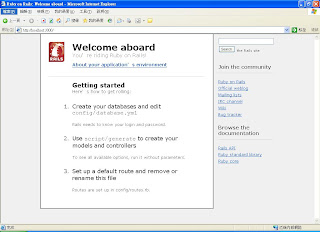
I am using Mongrel Web Server and the Diagram-91 shows the screen dump of http://localhost:3000/

Diagram-91 - Screen Dump of http://localhost:3000/ where animals is running
3. Create the controller to make the application do an action. This is under the controller-action/model-view structure.
Stop the WEBrick server each time you edit Ruby classes and then re-start or refresh the views you are testing. Use the Ruby command below:
>ruby script/generate controller Mammal
The mammal_controller.rb contains just a bare class description:
class MammalController< style="font-weight: bold;">Answer:
In this step, the class Mammal is created and the related Diagram-92 is stated as follow.

Diagram-92 - Mammal class is created
4. Test the controller by starting the WEBrick server and navaigatibng the browser to http://localhost:3000/mammal Note how the controller name is appended to the end of the URL and that no action resulted because there are no controller methods.
Answer:
The Diagram-93 is the screen dump navigating in Browser to try to see the Mammal class.

Diagram-93 - Navigating the Mammal class but it fails
5. Create an action by editing and saving the mammal_controller.rb class in projects\animals\app\controllers using your text editor to add the method below:
class MammalController< style="font-weight: bold;">Answer:
In Diagram-94, the breathe method of Mammal class is defined.
 Diagram-94 - breathe method of Mammal class
6. Start the WEBrick server and browse at http://localhost:3000/mammals/breathe where you will get a “missing template” message since it is missing a view for the breathe method.
Rails is trying to connect the breathe method action of the mammal controller to a view, by using the action’s name – breathe. This view template is created as breathe.rhtml and stored in the \projects\animals\views\mammal directory.
Answer:
Although the breathe method is defined in controller, the view is not recreated yet. Thereby, entering http://localhost:3000/mammals/breathe in browser returns missing template error. In Diagram-95, there is the related screen dump.
 Diagram-95 - missing template
7. Create and save a view in that directory by using a text editor to create a view called breathe.rhtml
Restart the WEBrick serve r and browse again at http://localhost:3000/mammals/breathe
Answer:
After the view is created for breathe method, http://localhost:3000/mammals/breathe returns an expected result. Diagram-96 shows the screen dump.
 Diagram-96 - breathe.rhtml is shown
8. Try Ruby code and HTML in the action view by using the <%....%> wrapper around the inserted Ruby code. Here are some snippets to try from workshop 4:
a. 5 + 6 =<%= 5 + 6 %>
b. =<% 4.times do %>
Inhale Exhale
<%end%>
c. Time is <%=Time.now %>
NOTE: in practise you normally perform calculations in the action (method) and pass the results to the view
Answer:
The result is shown in Diagram-97.

Diagram-97 - modification of the codes of breathe.rhtml
Part B: The active view: passing data from an action too a view
1. Create a new application called scenery in the same projects directory to demonstrate the use of an active view.
> rails scenery
> cd scenery
Answer:
The command output is shown in Diagram-98.
 Diagram-98 - the command output of "rails scenery"
2. Create a controller called Demo in scenery\app\controllers
scenery> ruby script/generate controller Demo
Answer:
The Demo controller class is created (see Diagram-99)
 Diagram-99 - Demo controller class
3. Add an action to demo_controller.rb as the method called rubycobe
class DemoController< style="font-weight: bold;">Answer:
I use text editor to modify the demo_controller.rb controller class and the Diagram-100 shows the screen dump of defining the method rubycode.
 Diagram-100 - rubycode method inside Demo Class
4. Add a view template - scenery\app\views\demo\rubycode.rhtml
We will edit this view in later steps but you may like to add your own test HTML code to the view at this stage.
Answer:
I use edit.exe text editor to edit rubycode.rhtml. The Diagram-101 shows the related screen dump.
 Diagram-101 - rubycode.rhtml
5. Save and restart the Web server and navigate to http://localhost:3000/scenery/rubycode
Answer:
The output of rubycode.rhtml is shown in Diagram-102.
 Diagram-102 - rubycode.rhtml
6. Use the Time.now example to pass data from an action to a view.
7. Modify and save the rubycode action with a value for the time instance variable in the DemoController class in app\controllers\demo_controller.rb
class DemoController< time_now =" Time.now">
9. Restart the Web server and navigate the browser to http://localhost:3000/demo/rubycode
Data has been passed from the action to the view as it is done with SQL requests. The instance variables of a Ruby class are available to view templates by referencing the action’s instance variables by name in the view .rhtml template.
Answer:
I have then modified the demo_controller.rb with the given instruction. After that, running http://localhost:3000/scenery/rubycode in browser returns that @time_now parameter is passed into rubycode view. It is called by reference. The diagram-103 shows the modified demo_controller.rb file and the output of rubycode.rhml.

 Diagram-103 - the modified demo_controller class and the output of rubycode.rhtml
Part C: Screen layouts and forms processing with text fields, check boxes, radio buttons and multiple list controls
1. Create a new application called scenery in the same projects directory to demonstrate the use of an active view.
> rails scenery
> cd scenery
Answer:
The cabs project is created as requested. The Diagram-104 shows the command output.

Diagram-104 - the command output of rails cabs
2. Create a controller called Vehicle in cabs\app\controllers
cabs> ruby script/generate controller Vehicle
Answer:
The Vehicle class is created and is shown in Diagram-105.
 Diagram-105- Vehicle class is generated.
3. Add an action to vehicle_controller.rb as the method called cabtype
class VehicleController< style="font-weight: bold;">
Answer:
I then added method to vehicle class (see Diagram-106)
 Diagram-106 - cabtype method
4. Add a view template - cabs\app\views\vehicle\cabtype.rhtml
We will edit this view in later steps but you may like to add your own test HTML code to the view at this stage.
Answer:
The view template cabtype.rhtml is created for the cabtype method. (See Diagram-107)

Diagram-107 - View Template cabtype.rhtml
5. Save the view and restart the Web server and navigate to http://localhost:3000/cabs/cabtype
Answer:
After that, I run http://localhost:3000/cabs/cabtype in the browser and get the result in Diagram-108)

Diagram-108 - The output of cabtype
6. Create a file in the public directory - \cabs\public called input.html
Answer:
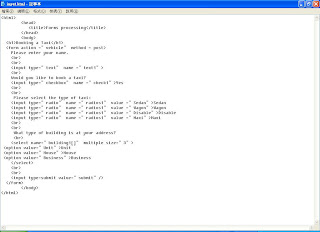
The input.html is created with the given html codes and shown in Diagram-109.

Diagram-109 - input.html
7. Edit the vehicle_controller.rb here is a start. The data in each form element in the Rails application can be accessed via its name and a hash called params.
class VehicleController< data1 =" params[:text1]" data2 =" params[:check1]" data3 =" params[:radios1]" data4 =" params[:building1]" style="font-weight: bold;">Answer:
The vehicle_controller.rb file is modified and shown in Diagram-110.
 Diagram-110 - the modified vehicle_controller.rb
8. Edit the view template cabtype.rhtml
Answer:
The cabtype.html is edited and shown in Diagram-111

Diagram-111 -cabtype.html
9. Start the Web server and go to the opening page of this application at http://localhost:3000/input.html
Answer:
http://localhost:3000/input.html is shown in Diagram-112

Diagram-112 - output of input.html
10. Submit the forms data. What do you find?
How it works
When you use the params method in Rails, it implements the details of the parameter hash to be changed without breaking existing code. For example, the params hash for radios1 will contain the value of the radio button and the data is extracted in the cabtype action. With the multiple list box example in Rails, using the select controls, the params hash of building1 is an associative array (dictionary) holding the users multiple selections and is not just a drop-down list.
Rails supports other HTML controls for forms processing via text fields, check boxes, radio buttons and list select controls etc. As an example start_form_tag abd stop_form_tag as well as methods for each item such as the create field method text_field_tag.
Answer:
My finding is when I enter the data in the field and click "submit". The data is passed from input to cabtype.rhml and also displayed in cabtype.rhml. The cabtype.rhml also does some logic checking. If the click box is not clicked, the program prompts error. (See Diagram-113)

Diagram-113 - The result after click "submit" button
11. Report your progress or findings in your Developers Blog.
Answer:
I have successfully implemented this workshop. All expected results are returned.
My findings is that
a. Many given links is wrong
b. Some html code does not obey xhtml standard, like br
c. The form cabtype.rhtml contains some wrong script. Sam Kwong and I debug it and get the expected result.


No comments:
Post a Comment