To Do:
Developers may continue to build upon work with the OTBS using the topic reading to help with user registration and advanced login features from Hartl et al (2008).
* generate a controller and an action by adding a method(s) to a controller;
* create a view template for each action and to link to actions from views;
* use AJAX to improve the user experience;
Share your success by posting progress comments and links etc to the Developers sub-forum site that has been set up for the Red team.
Answer:
From Workshop 1 to 4 , I have successfully built the simple taxi booking system and now I will briefly describe this Online Taxi Booking System (OTBS) according to the Workshop6's requirement.
Taxi & Passenger ActiveController and the related ActionViews (list, show, create methods) have been built during Workshop1 to 4. The Diagram-121 to Diagram-127 shows what I have been done for these Workshop.

Diagarm-121 - The List method of Taxi Class shown in ActionView (list.rhtml)
In Diagram-121, when users click on one of the Taxi link, the detail of that Taxi will be shown like the one in Diagram-122
 Diagram-122- The Show method of Taxi Class shown in ActionView (show.rhtml)
Diagram-123 - The index method of Passengers class shown in index.rhtml
In the index.rhtml, when users click "new passenagers" link, users can add new passengers to book the taxis.

Diagram-124 - The new method of Passengers Class shown in ActionView (new.rhtml)
When users click on "show" link in index.rhtml, the users can see the detail of booking' and passengers' record.

Diagram-125 - The show method of Passengers Class shown in ActionView (show.rhtml)
When users click on "edit" link in index.rhtml, users can modify the existing booking.

Diagram-126 - The edit method of Passengers Class shown in ActionView (edit.rhtml)
When users click on "destroy" link in index.rhtml, users can cancel or delete the booking.

Diagram-127 - The destroy method of Passengers Class
I have successfully create a template for ActionView. The template is called 'standard'. All the views in OTBS will use this template. The following is the screen dump of one of the views.

Diagram-128 - The list ActionView (list.rhtml) of Taxi Class after applying the template to the ActionView
The AJAX is also utilized in order to enhance user's experience. My AJAX is to add a new taxi in ActiveRecord of Taxi Class. When clicking "add a Taxi" link, the text box and add button are shown (See Diagram-129).

Diagram-129 - AJAX functionality so as to add new Taxi
When the text field and add button are shown, users can type in the name or the brand-name of the Taxi. For example, I add Honda as the Taxi's name. (See Diagram-130)

Diagram-130 - Entering the name of the taxi
After the name is inputed, users can click "add" button to add the Taxi and the newly added Taxi will be displayed in the same html page directly due to the feature of AJAX.

Diagram-131 - New Taxi Name "Honda" is added and displayed once the "add" button has been clicked
The next diagram show the template 'standard' is applied to Passenger ActiveController.

Diagram-132 - The Passenger ActionController together with the template 'standard'
The source code of the template 'standard' is put into the "/app/views/layouts" folder and the file name of the template is called 'standard.rhtml' or 'standard.html.erb'.

Diagram-133 - The template 'standard' for all views inside OTBS system
In the template 'standard', there is a Cascading Style Sheets (CSS) used and stated. This CSS is used to help to format the views to display, for example, formatting the font size. The source code of the CSS called 'style.css' and located at 'public\stylesheets' is shown in Diagram-134.

Diagram-134 - the source code of style.css stylesheet
Next, the Diagram-135 shows the ActionView of Taxi Controller Class. The list.html.erb is for list method defined in Taxi Class. The show.html.erb is for show method define in Taxi Class. The _taxi.html.erb contain the JavaScript for the AJAX functionality inside list.html.erb.

Diagram-135 - ActionView for Taxi Controller
The source code of _taxi.html.erb JavaScript is listed in Diagram-135.

Diagram-135 - the source code of _taxi.html.erb
The source code of the list.html.erb contains the AJAX code which calls _taxi.html.erb Javascript.

Diagram-136 - The source code of list.html.erb
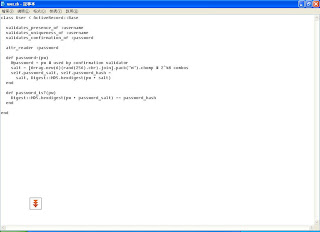
From workshop6's requirements, I need to create user authentication and user registration. Therefore, I create the related controller and method. The controllers' names are main (user registration) and panel (user authentication). In order to create the ActiveRecord and the table in MySQL, I first use "ruby script/generate model User" to create the "user.rb" (See Diagram-137)

Diagram-137 - The content of user.rb
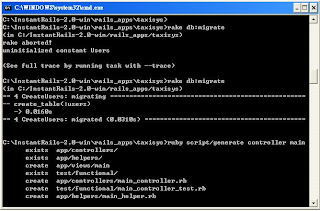
After that, according to the definition inside user.rb, the user table is created. The Diagram-138 shows how to create the table using rake command and the ruby command to create main controller for user registration.

Diagram-138 - Rake Command to create table and Ruby command to generate main controller
In diagram-138, the main controller is created. To customize the main class, I have modify main_controller.rb under '/app/controllers/' folder.

Diagram-138 - main_controller.rb
In Diagram-138, the register method of User Class is defined.

The Diagram-139 is the ActionView for the register method.
Besides, in order to make registered users can login, I create panel controller for users' login. (see Diagram-139)

Diagram-139 - the creation of panel controller
The panel_controller.rb is located at "/app/controllers/" folder. Then I modify the panel controller. (See Diagram-140)

Diagram-140 - the content of panel controller where the login method is defined
The login method is then handled by ActionView. Now, the view is login.html.erb. (see Diagram-141)

Diagram-141 - login.html.erb
When users logs into the system successfully, the portal will be accessed. Thus, the portal controller is generated (see Diagram-142)

Diagram-142 - the creation of portal controller
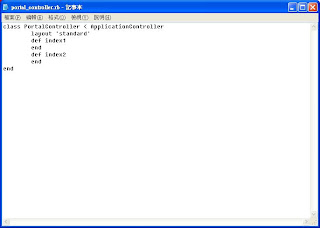
Inside the portal controller, index1 and index2 methods are defined.

Diagram-143 - index1 & index2 methods inside portal controller
The Diagram-144 shows the index1 ActionView (index1.html.erb)

Diagram-144 - index1.rhtml
The Diagram-145 shows the index2 ActionView (index2.html.erb)

Diagram-145 - index2.html.erb
After all, the functionalities of user authentication and registration inside OTBS are workable. For example, in Diagram-146, when the user does not enter username for registration, OTBS will prompt an error.

Diagram-146 - User registration when errors
To correct the error in Diagram, the user should fill in the username field (no empty field is allowed). The Diagram-147 shows the correct information is entered.

Diagram-147 - correct information during user registration
After the correct information is entered into system and "register me" button is clicked, OTBS will tell the user that he or she is registered successfully (see Diagarm-148)

Diagram-148 - successfully registered
Once registered, the user need to login. The Diagram-149 shows the logon screen but the user login with wrong password so the error is prompted.

Diagram-149 - Login Page with error when wrong password is applied
The Diagram-150 shows the user login with the correct password.

Diagram - login page with user's input
After successfully login, the user can view the information of Taxis or book Taxis.

Diagram-151 - At Portal after successful login
The user can select view Taxi's information or book taxis (See Diagram-152)


Diagram-152 - Book Taxi or View Info
I have successfully met the requirements...
1. User Ajax --> Done
2. Use Template and CSS --> Done
3. Create Controller Class and Create method and View for the Class --> Done
Reference:
1. http://codingbitch.com/p/comboy/User authentication in Ruby on Rails
2. http://www.ruby-forum.com/topic/91797


No comments:
Post a Comment